Hittite Chariots and Chariot Runners

The Hittites are coming along nicely now with the addition of another bases of chariots and two bases of light infantry chariot runners.

As with all the Hittites so far, these are 15mm Red Copper miniatures 3D printed by Baueda in Italy. Yes, the lead time is slightly extended, but I have found the Baueda prints very high quality and as there’s a set postage fee of €12.50 however much you order and wherever it’s going to, buying in volume makes the whole process very cost-effective indeed. Recommended as a source of the Red Copper range.

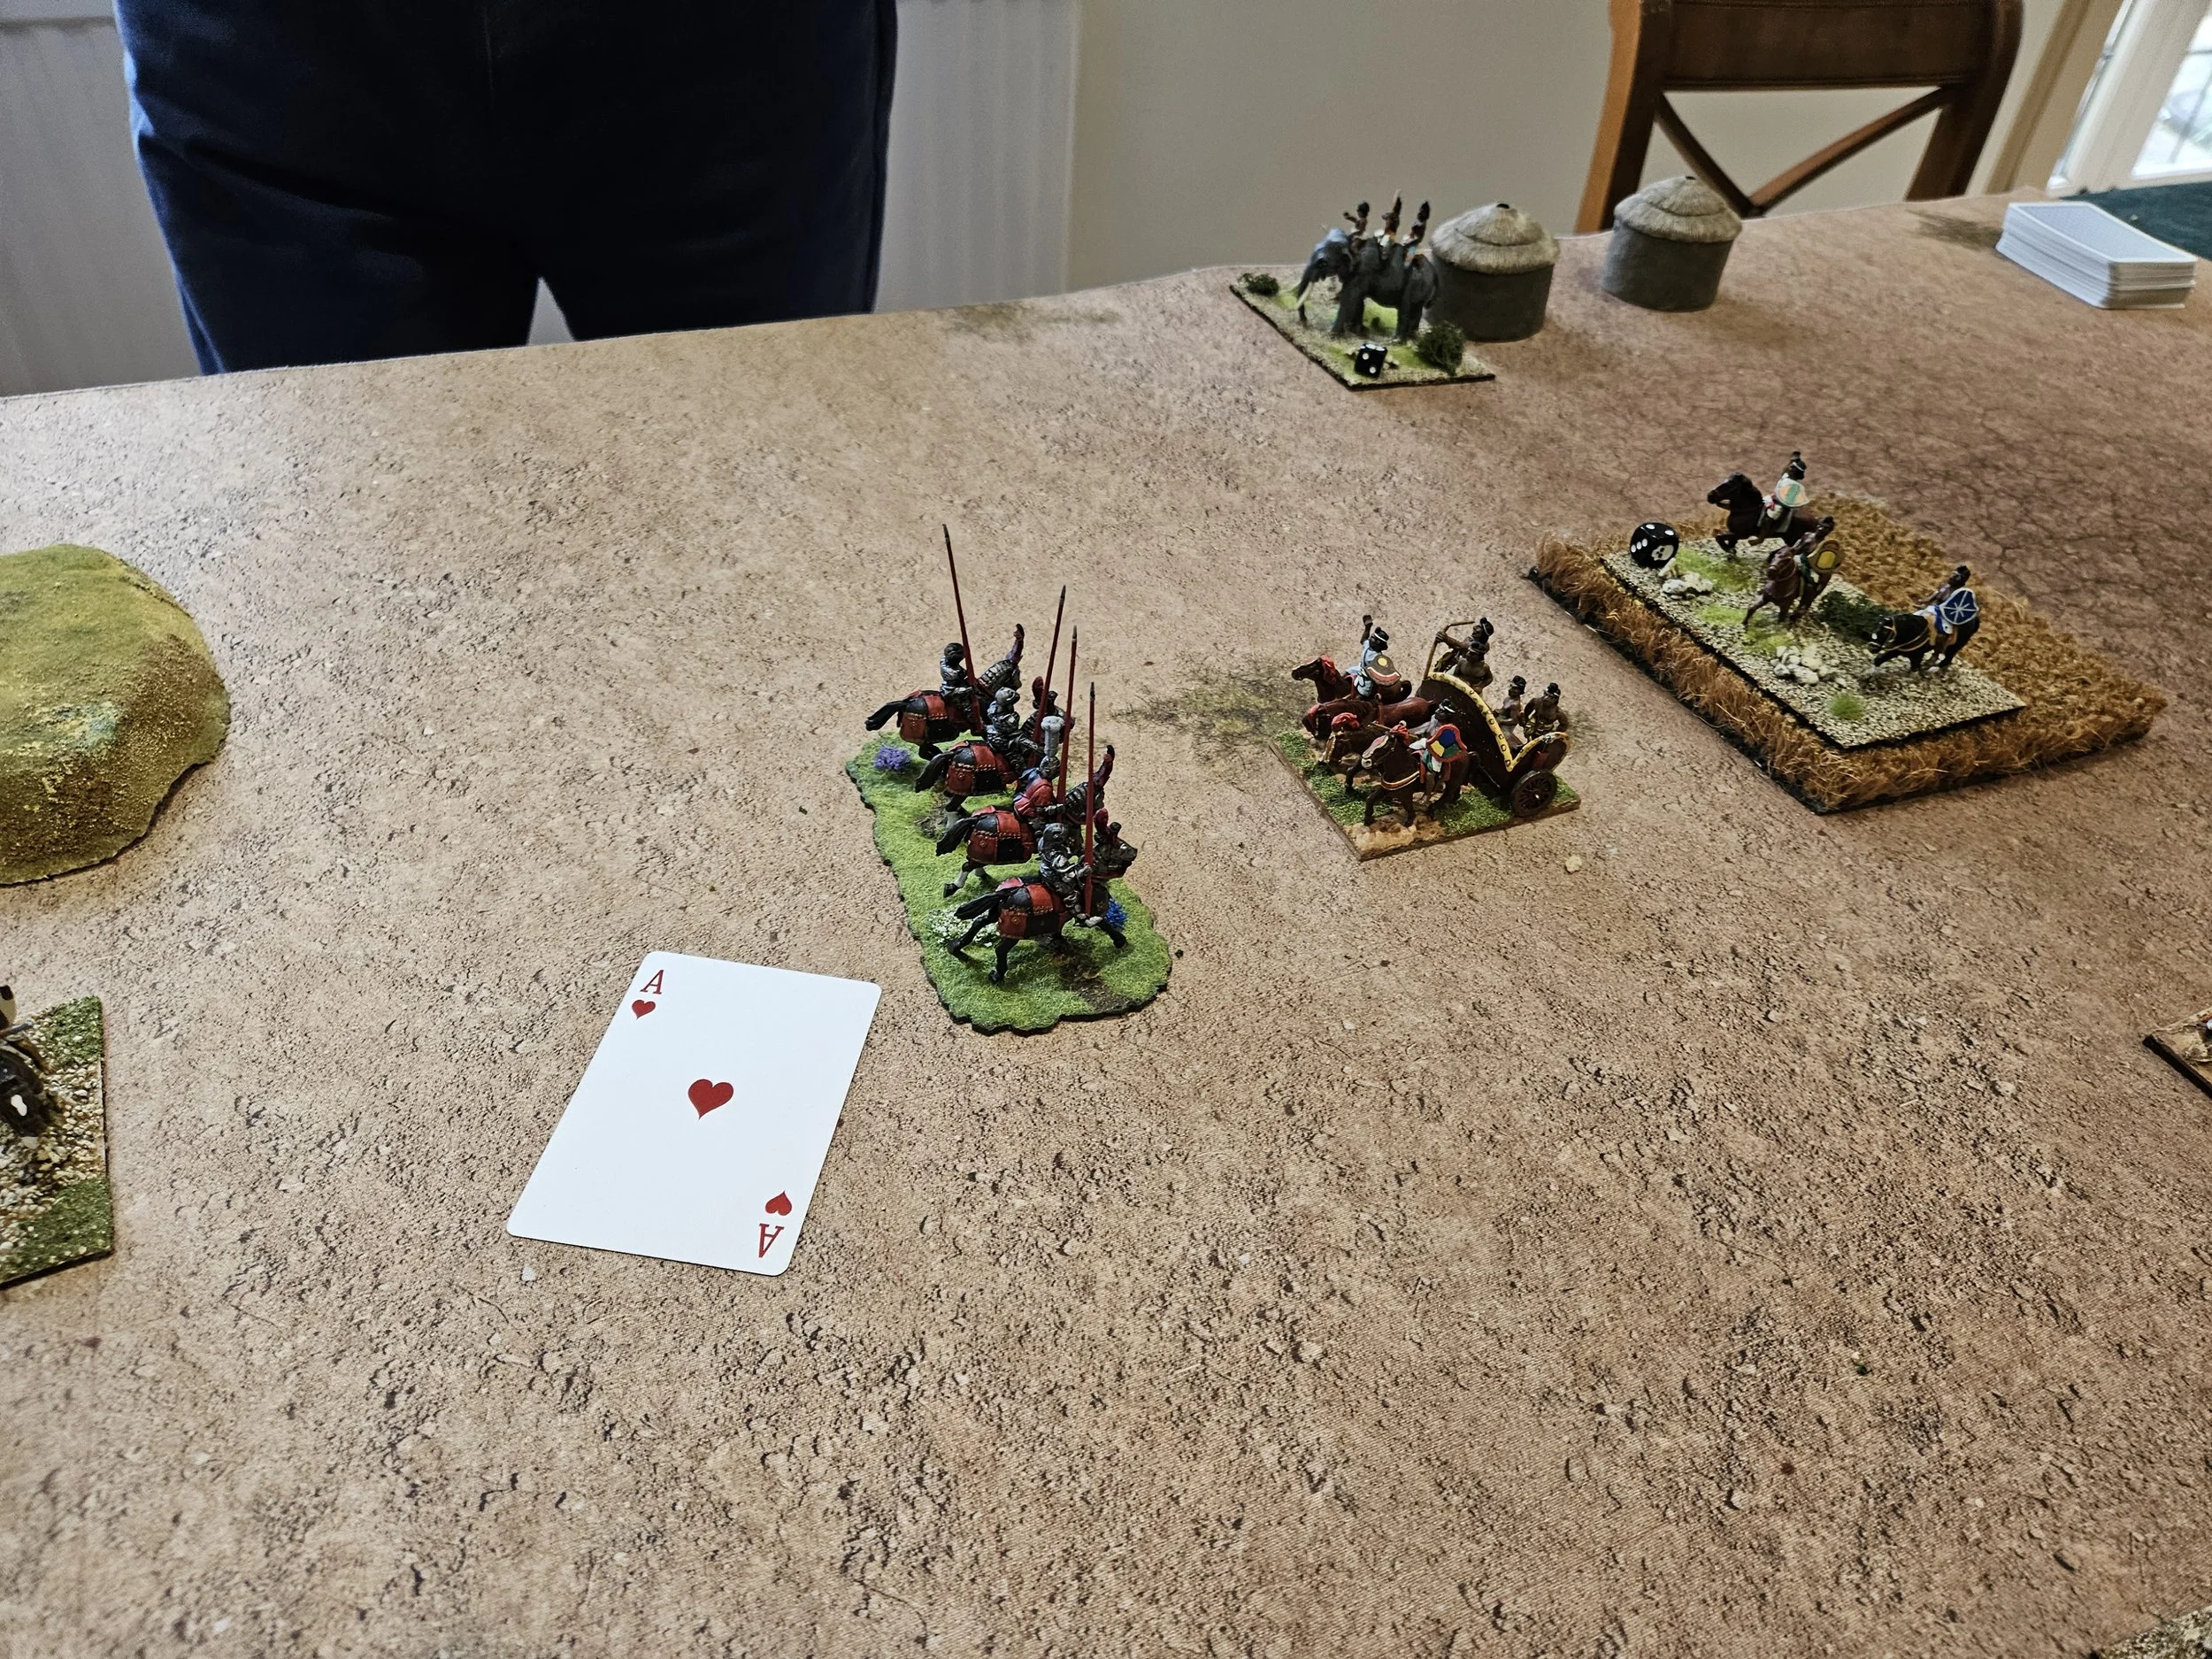
First up are another two heavy three-man chariots. It looks like the chariot on the left is only manned by two crew, but that’s because there’s a chap taking a breather sitting on the back of the chariot, presumably regularly asking “are we there yet?” to his two comrades!

I can’t emphasise how nice these models look in real life. They’re a pleasure to paint too, with the relief so clear that getting the ‘plank’ effect on the chariot bodies is easy (you just have to stay within the lines!) and the horse-armour just about paints itself (dry-brushed bronze over a Snakebite Leather base if you’re interested).

Then I’ve finished a couple of bases of light infantry chariot runners. In To The Strongest, these are light infantry with javelins, but I quite like the light axemen look of the Red Copper figures:

Again, very easy to paint and highly recommended.

Now onto the rest of the light infantry, the ally-Syrian light chariots, and more chariots…

TFL Painting Challenge: Late October Update

There’s only a couple of months left before the end of the year, so what better time to get those Painting Challenge entries in.

First up this update, we have Carole, who has painted an outlaw band plus a couple of extras:

Next we have more “little planes” from Mr Luther: some real behemoths in this submission:

Nick Cooper has also been busy with a collection of figures fantasy. This is only some of them, so make sure you check out the rest in his full gallery.

Mt Helliwell sends in his usual large entry. Again, far more to see in his full gallery. Where does he find the time?

And last but by no means least is Sapper, with a mix of scales from 10mm through to 28mm:

There’s still plenty of time to get your entries in, so keep them coming!

IABSM at The Other Partisan

I didn’t get to The Other Partisan this year: real life getting in the way of wargaiming again!

A pity, as there look to have been many excellent games on display including those in the now usual Lard Zone.

Featured below are photographs from Michael Curtis from the I Ain’t Been Shot Mum Facebook Group of the superb 28mm Gold Beach, King Sector, 6th June 1944 game.

TTS AAR: Anglo-Normans & Akkadians

Time for another game of To The Strongest: my Anglo-Normans would take on friend Rob’s Akkadians, both sides using figures from Museum Miniatures excellent 15mm Z range of CAD designed miniatures.

The Anglo-Normans (half Normans, half Vikings!) won the scouting and advanced forward to take the centre of the battlefield.

The Akkadians responded with an advance of their own, and before long the two sides were ready for the first clashes:

On my left flank, I managed to get two units of Norman Knights deep behind Rob’s main line with only a couple of units of Akkadian spearmen to hold them off.

Unfortunately, although the Knights managed to get the advantage, they never really managed to exploit this to its full extent: failing to either finish off the remaining spearmen, take an enemy camp or even curl back to take the rest of the Akkadians in the rear. In the end, the sector became a side show for the main battle.

Just to the left of the central hill, the Anglo-Saxon contingent of the Anglo-Normans faced off against more Akkadian spearmen. I thought I had a decent advantage here: two deep warbands plus a couple of skirmishing bowmen versus two enemy spearmen units, but if you look closely in at the first picture in the gallery below, you can see another Akkadian unit lurking in the background. This unit turned out to be the Akkad City Guard, armed with great big axes.

The two lines clashed, and although one of the warbands burst through the enemy line and headed towards their other camp, the rest of the combat was, again, pretty much honours even, especially when the Akkadian axemen intervened.

Which left the main action to take place in the right-centre of the field.

Initially, things looked quite good: I pushed the enemy on the hill backwards and then got into a position where I could flank the units just to the right, with my cavalry preventing the Akkadian chariots from outflanking my line.

Unfortunately, I just couldn’t seem to take advantage of the situation, and the next thing I know it’s my infantry that are being flanked and, indeed, the whole of my troops on that side of the table were crumbling!

I’m still not quite sure how this happened!

At this point the battle was effectively lost, particularly as the Anglo-Saxon warband that had brokne through the enemy line had failed to take the enemy camp and was now surrounded on all sides and fighting for its life, with things being no better around my own camps.

A few moments later, that was all she wrote: the Anglo-Normans thoroughly trounced by the Akkadians: just goes to show that newer isn’t always better!

More Hittites

Here are the next few units for my 15mm Hittite army using Red Copper Miniatures, once again ordered from Baueda in Italy as there seems to be a distinct shortage of UK 3D printers doing the Red Copper range and I have always found Baueda very reliable and fairly priced.

First up is another unit of Spearmen, meaning that I now have all the regular infantry I need.

Hittite Spearmen from Red Copper Miniatures

And then we have two sets of Hittite chariots, meaning that I only have one set of Hittite chariots to go, although there are three bases worth of lighter Syrian chariots needed as well.

The second chariot in from the left is a command chariot.

Lovely figures all, and easy to paint up and base. Highly recommended.

So now a little wait until the next batch arrive for painting!

FK&P AAR: Laundry Day

My play-through of the Siege of Norchester campaign for For King & Parliament is really hotting up. After the encounter at Happy Valley, where Rob’s Royalists were thoroughly trounced by my Parliamentarians, it was time for Scenario 9: Laundry Day.

As background, despite their defeat in the Valley, the Royalist relief force has managed to get through the Parliamentarian cordon and sneak (if you can sneak a multi-battalia army!) through to the rear of the Roundhead lines where, as luck would have it, it’s laundry day. The scenario pits a force of Cavaliers on the offensive against a line of Parliamentarian camps, the loss of each of which would cost the Roundheads valuable victory medals.

The Royalists had the initiative and, after a bit of manouevring to get over the hedge in front of their initial positions, started forward, rapidly followed by a similar advance from the Roundheads.

After an exchange of infantry fire on the central hill that left several men dead on each side, the first main clashes occured between the cavalry forces on the wings.

Honours were even on the left wing; but on the right wing the only veteran Parliamentarian squadron of Dutch horse charged, was counter-charged, and then dashed from the field by a squadron of Royalist Swedish horse. This was a very unpleasant start to the action for the Roundheads!

Meanwhile, the two infantry lines had closed in the centre, and an inconclusive firefight broke out followed by a couple of equally inconclusive melees: the Roundheads (a) notably failing to break a mob of Royalist followers, (b) failing to have any impact at all with a supposedly-devastating first charge by some Border Reivers (the Highlanders in the pictures below), and (c) being pushed back from the hill in the centre of the field.

Worse for the Rpundheads, they had now decisively lost the cavalry battle on the right wing, leaving the Royalists free to advance and capture one of their camps. This cost three vital victory medals that I could only replace if I could re-take the camp: something that was, and excuse the TTS in-joke, not on the cards!

My cavalry on the left wing weren’t, however, doing too badly, but my problem was getting them back into a position from where they could affect the rest of the field. Some of them were pursuing fleeing enemy off the table, others had only just rallied up from disorder.

But my time was almost up. With the medals I had lost so far, the Parliamentarian force was close to breaking. Okay, so the Royalists were a bit battered too, but they hadn’t lost a camp!

I attempted a counter-attack in the centre, and came close to breaking through…and managed to get my pursuing cavalry on the left turned around and heading back to the action…but just didn’t now have the staying power of the Royalists.

Rob and I swapped unit for unit losses, but the simple factof the matter was that I ran out of coins before he did.

Metaphorical taila between their equally metaphorical legs, the Roundheads snuck from the battlefield, leaving the victorious Royalists to reinforce beleaguered Norchester.

So from being several coins ahead over the campaign as a whole I was now down seven coins overall: proving that you can’t afford to lose your laundry if you want to take a city!

Three games to go, with an encounter at Ramshackle Road being next…

Painting Challenge: First October Update

Here’s a look at our first entries for October for this year’s Painting Challenge.

First up is Mr Helliwell’s monthly entry: mostly Napoleonics this time. Take a look in his gallery (accessed via the Nav bar, above) to see everything he’s sent in, but here are the four 24-figure 15mm British battalions, using AB Figures:

Next up we have Steve Burt with a couple of entries, all WW2 figures from Atlantic. Partisans and a lone German!

Chris Kay sends in some warrior women: Viking shield maidens and surely the one on the left in the last photo is the sci-fi equivalent…

Now we havea couple of mass army shots. On the left is Sapper with vast amounts of French Napoleonics; on the right is Mervyn with the beginnings of an ECW force (which is apparently my fault!):

That’s it for this update: keep sending them in!

TTS AAR: Elephant Screen Part II

With the Alexandrian Macedonians defeated twice by Peter’s Made-Up Ancient Indian army (designed to experiment with the relatively new Light Infantry - Elephant Screen troop type) it was time to give someone else a go: step forward my trusty Venetians.

I’d like, at this point, to laucnh into an exciting battle report where the initiative, luck and clever use of tactics swung first one way then the other, all culminating in a glorious Venetian victory by the narrowest of margins…but I can’t. The appalling cards that had been the downfall of the Macedonians followed me into this game with entirely predictable results:

Well that’s not entirely fair on Peter: having won the scouting, his skillful deployment meant that I was largely on the back foot from the start, with his army almost wholly threatening my right flank.

I had, however, managed to get my troops into a position to blunt if not fully counter his attack, but was then, as you can see, betrayed by the cards.

Okay, so the mounted ballesteri lights in the first picture might not have done much to the elephant they were trying to assault, but the Knights in the second picture were surely onto a chicken-dinner winner! And don’t talk to me about the Knights versus the chariots in the third picture: what you aren’t seeing is the rear charge that they had also failed to make in the previous turn!

Here’s a helicopter-view shot of early in the battle showing the way Peter had managed to get onto my right flank and effectively fight a third of my army with all of his:

But hopefully you can also see how I have managed to get my troops into a position where I have Knights ready to counter his cavalry and have manouevred to get a two:one advantage on his lead attacking unit (see close up picture, below) all brought to nothing by the cards!

So that was the end of our session: three defeats for me at the hands of the Made-Up Indians with their high numbers of Elephant Screen units.

Even though the Screeners didn’t make that much difference to the results in the end (my losses were down to Peter’s skillful play and the cards) I am still quite glad that they are made-up Indians and not one I expect to face in future!

Just off to tend to a small bonfire in the back garden, and anyone know where’s the best place to get some new sets of cards!

IABSM AAR: Action near Pestszentimre

Here’s another great I Ain’t Been Shot Mum after action report from the keyboard and camera of Mark Luther.

Action from the Eastern Front as Hungarian assault gun batteries and grenadiers of Feldherrnhalle take on the Soviet 4th Guards Mechanised Brigade in April 1944.

This game was played at GigaBites Cafe in August 2024. Click on the picture below to see all:

TTS AAR: Elephant Screen Test

Off to Peter’s house for a bit of training in the run up to this year’s Warfare tournament. My aim was just to have a few enjoyable games of To The Strongest, Peter’s aim was to thoroughly investigate the capabilities of the relatively new troop type Light Infantry, Elephant Screen (there’s a reason he wins a lot of tournaments!).

Peter had therefore constructed a mythical army consisting mostly of elephants, a good half of whom were included in the aforementioned light infantry screening units. We’ll call these the “Made Up Indians” or MUIs. I would fight our first battle with some Imperial Alexandrians: pike, Companions and lights.

I had lost the scouting - hardly surprising with all those light units on the other side of the table - and soon found myself watching a whole herd of pachyderms thundering towards me.

To translate the pictures into something useful, the elephants with red howdahs or cloths are ‘normal’ escorted Indian elephants, the others are the light infantry/elephant screening units.

Not wanting to get caught on my base line, I advanced forward, driving the lights backwards. This, however, left my relatively narrow frontage army vulnerable on the flanks: Peter taking full advantage by heading down towards my empty right flank with his cavalry and chariots, seeking to turn my flank and roll me up.

Note how my two units of cavalry , centre-bottom in the picture above - are faced by escorted elephants i.e. kept occupied whilst his flanking force curls around the rear. It’s easy to see this happening in hindsight and in the photos, not so easy to see it and prevent it on the tabletop!

The inevitable happened, and I found myself fully engaged from the front and hit in the right flank: things were not looking good!

The writing was now on the wall: my cavalry were forced to leave the table, and had real difficulty getting back on and, despite some success elsewhere, I was soon hamorraging victory medals and defeated!

The only good thing was that it was a fairly quick battle, leaving us time for a re-match…but that’s another story!

The Re-Match

With my defeat in the first game partly due to being outflanked, I decided on a change of tactics for Game 2: rather than set up in the centre of the field, I would huddle in one corner, ermging to cruch the MUIs once their dispositions had been revealed.

At this point it’s worth reminding regualr readers that sometimes Lady Luck is decidedly, shall we say, unkind to me. Well, today, she really went to town!

Rather than a full report, I invite the reader to count the number of Aces drawn in the pictures below:

And that’s just a selection! In the same game, Peter managed to have a unit of cavalry enter the table and then pull an 8, 9, 10 for activation cards to send a unit of my elite cavalry routing off the table. Sometimes, it’s just not worth setting out the figures!

Painting Challenge: Mid-September Update

Some great entries this time around, headed by our two top contributors Matt and Andrew.

First up, here’s Matt’s latest offering: some fantastic terrain pieces nearly all built for a pirate game, me Hearties!

And here’s some of Andrew’s contributions: as always, a mixed bag:

Let’s look at the other entries received so far this month. Here are entries from Steve, Mervyn, Stumpy and Carole:

Some lovely work there…and be sure to check out their main galleries, accessible through the NavBar, above.

More Hittites

A couple more units for my 15mm Hittite army using Red Copper miniatures printed by Baueda.

First up is the first of the command bases: a unit of 3-man chariots with attached General:

Next is the first unti of line spearmen: quite a chore to paint with all their different robe and shield colours:

Very nice figures: very easy to paint and enough variety to make the units look good.

Now to paint the same again for the next batch!

Colours 2024

Off to Newbury racecourse for the annual Colours show there. A great day out that started with an unlimited breakfast at the nearby Toby!

Parking is free and a short walk from the grandstand where the event takes place. The entrance fee for Colours is only £5, which makes it a real bargain compared to some of the other shows that I have been to recently.

Highlight of the show was seeing Simon Miller’s new War of the Spanish Succession version of To The Strongest/For King & Parliament in playtest:

These seem like a must-have once they are out, and will presumably give me an excuse to buy loads more little soldiers as I haven’t got any early 18C figures yet. Tricornes ahoy!

Bumped into loads of people I know and/or haven’t seen for some time: Colours is a very relaxed occasion, so very good for that sort of thing.

Wandering around, there were some very nice games on show. Plenty of big battles involving loads of figures (which I did photograph) and a selection of mini-games and boardgames (which I did not!).

Note that the last four pictures are of the same game.

The shopping opportunities were, as usual, very good. I picked up some much-needed basing material and could have a root around all the 28mm Ancients plastics as I attempt to choose next year’s competition army.

Colours is firmly on the list of shows to visit again next year: recommended.

TTS AAR: Britcon Game 5: Venetians vs Florentines

My final game at Britcon this year was against another Italian Condotteri army: Nigel’s Florentines.

Although technically a different army to mine (an Early Italian Condotteri army versus my Later one, and from Florence as opposed to Venice), Nigel’s force was actually/obviously quite similar to mine, with the contemporaneous nature of the clash promising an interesting game.

As you can see in the picture below, we even deployed in a similar way!

The oppening phases of the game saw both sides plagued by a series of Aces, something I had (quite surprisingly!) managed to avoid in the tournament so far.

Nevertheless, the Venetian Knights advanced strongly on the left wing, and managed to get into a position where I could threaten to roll up the Florentine line, with the only thing standing in their way being a couple of units of enemy Lights…

…who were disposed of in short order:

My other command of Knights was also in the process of doing the same thing on the other side of the battlefield:

Back to the left flank, where my initial success was now being slightly stymied by a combination of a really annoying unit of enemy Knights that just wouldn’t die and my decks of cards who had obviously decided that I had been having far too easy up until now:

Despite this, however, the rest of my troops on that flank had started to knock Florentine units off the board, helped by the Venetian infantry who had now caught up and were eager to join in the fun.

Things were also still going well on the right flank apart, again, for one really annoying enemy unit: this time a bunch of Light Infantry with Melee Weapons: a relatively new troop type who had the temerity to charge my overall commander, with army standard, bodyguard knights etc, in the flank!

I remember this being a deeply frustrating phase of the game, where a couple of Florentine units on the wings distracted me so much that it kept me from properly enjoying the process of destroying his centre…but the writing was on the walls of Florence and soon Nigel’s last victory medal was mine for a 181-38 point victory.

With all five games now done, as organiser I totted up everyone’s points from all the games and discovered, a bit to my embarrassment, that I was actually the overall winner, and with a clean sweep of five victories out of five.

So a good result at what had beena cracking tournament overall. All the games were fought with a great spirit of friendly, competitive, fair play, with no arguments marring the event at all.

My thanks to all those who took part (especially my opponents), to all the organisers at BHGS, and to Derek, who was kind enough to do all the list checking. Make sure you keep 7-9th August 2025 clear for next year’s competition.

First of the Hittites

I mentioned in a previous post that I was so happy with the 3D printed Red Copper New Kingdom Egyptians that I had printed by Baueda to fill in the gaps of my newly-rebased NKE army that I decided to do what I’ve been wanting to do for some time and get a 15mm Hittite army for them to fight.

I duly ordered the figures, again getting Red Copper 3D sculpts printed by Baueda (under a week to print the figures, only four days in the post from Italy) and went to work, starting with a base of Hittite chariotry and a base of the Royal Guard.

The chariots are, again, fantastic sculpts. The chariot bodies come with very clearly defined panels, making it very easy to get the striped effect you can see above. These were painted all over in a dark colour, then highlighted in a lighter version of the same colour, standard acrylics.

The crew are as easy to paint as the NKE infantry were, and are, as you can hopefully see, full of character. The three charioteers actually fit into the chariot body without being too crowded: snug but not rush-hour tube, and have plenty of variants to make the base look unique.

The horses are the most fun to paint. Again, clear relief and detail to show you exactly where to put the paint. I used Contrast Snakebite Leather highlighted with Bronze for the armoured coats, and a combination of the same colours I’d used on the chariot body for the tack.

The Royal Guard came out really well too. I decided to make them uniform to suggest they were regulars, intending to dress the Spearman units, when I come to do them, in different coloured robes and without the same uniformity in shield colours.

There are plenty of poses, they are easy to paint, and ther was only a minimal amount of 3D flash on them.

Both the chariots and the Guard are highly recommended.

TTS AAR: Britcon Game 4: Venetians vs Thessalians

My fourth game at Britcon was a re-match of the warm-up game I’d had on the Friday evening before the tournament started: my Venetians versus Adrian’s Thessalians.

The stakes this time around, however, were much higher: we were ranked one and two in the tournament so far, so whoever won this game would end up perfectly placed to take the title. It would be fair to say that I was a little nervous about this one: my Venetians had been hammered on the Friday night (as in soundly beaten not drunk as a lord!) and I couldn’t afford to let that happen again.

The Thessalians were another largely infantry army, and I’d beaten three of them already during the competition by sending my Knights around one or both flanks. Adrian, however, was far too canny to give me the opportunity to do that: his men were deployed to cover just about the entire width of the table, so no room around the sides!

His left flank, however, did look a bit weaker than his right and centre (where those nasty veteran Hoplites were waiting) so if I couldn’t go around a flank, I determined to punch through it using my larger command of Knights. First off, however, I had to deal with Adrian’s cavalry there, who were attempting to do to me what I’d done to others!

In the meantime, I kept my main line rigidly under control, just advancing far enough forward to give me a little retreating space should I need it.

Things continued to go well on my right: the Thessalian cavalry were disposed off (either routing or retreating off table) and, more importantly, two of my Knights units were now free to crash right the way through to the enemy base line.

Meanwhile battle had been joined in the centre, with the combination of Alabardiers and Picchieri proving more than a match for the Thessalian Hoplites, with the threat of a single unit of Knights enough to keep Adrian’s right wing forces at bay.

The Knights on the right finally properly broke through, with one unit heading for and taking the enemy camp (despite the best efforts of some pesky enemy light infantry) and the other crashing into the rear of the Thessalian reserve.

The game should have ended here in a Venetian victory but, unfortunately, I had made a mistake on my right flank: I had positioned my Knights and Lights there to keep the enemy light cavalry that had retreated off table from coming back onto the board, but forgot what they were there for and decided to “get my Lights back into the battle”. This let Adrian bring his light cavalry back onto the table, meaning that when his camp fell, he had one coin left rather than none.

How annoying!

The writing was, however, on the wall, and it was only a matter of time before I managed to get the extra coin I needed to win the game, but it was a pain in the backside and could have let Adrian back into the match.

Fortunately I managed to take the final coin needed before his Hoplites could relieve his camp: a 188-23 victory for the Venetians.

IABSM AAR: Somewhere in Normandy

Here are some great pictures from a game of I Ain’t Been Shot, Mum played in 20mm by Mercian Miniatures, taken from the IABSM Facebook Group.