Q13: Chuhuac Raxa Light Assault ship

The latest release* for the Chuhuac (space dinosaurs with guns) from Loud Ninja Games (available through Alternative Armies) involves something that many ranges of sci-fi figures ignore: air support.

*When I say “latest release”, these have been available for some time: I just haven’t got around to painting them!

First off the painting table is the Raxa Light Attack Ship that can be assembled either landed or in flight…so I bought two so that I could field one of each.

The picture on the right shows the landed version, with its wings folded up. The kit comes in four main parts: the fuselage - the head and two wings - plus two legs and a cornucopia of weaponry that can be attached to various hard points on the craft.

It’s pretty easy to put together: the head slides onto the fuselage easily, the wings will just about balance upright and, believe it or not, the ship will balance on its two ‘chicken legs’ without too much difficulty.

To get the legs even, so that the ship didn’t list to one side, I popped a drop of PVA and superglue into each of the slots the legs fit in to, put the legs in to the slots and, whilst the PVA and superglue were still hardening, gently stood the model up as I wanted whilst still holding it’s weight. Once I was happy that the legs were even, I then made sure the legs were at least partially dried in place (i.e. wouldn’t move if tilted the ship) then found a way to balance the ship mostly upright without the legs touching the floor.

Note that the transparent base didn’t come with the kit: I had that in the bits box.

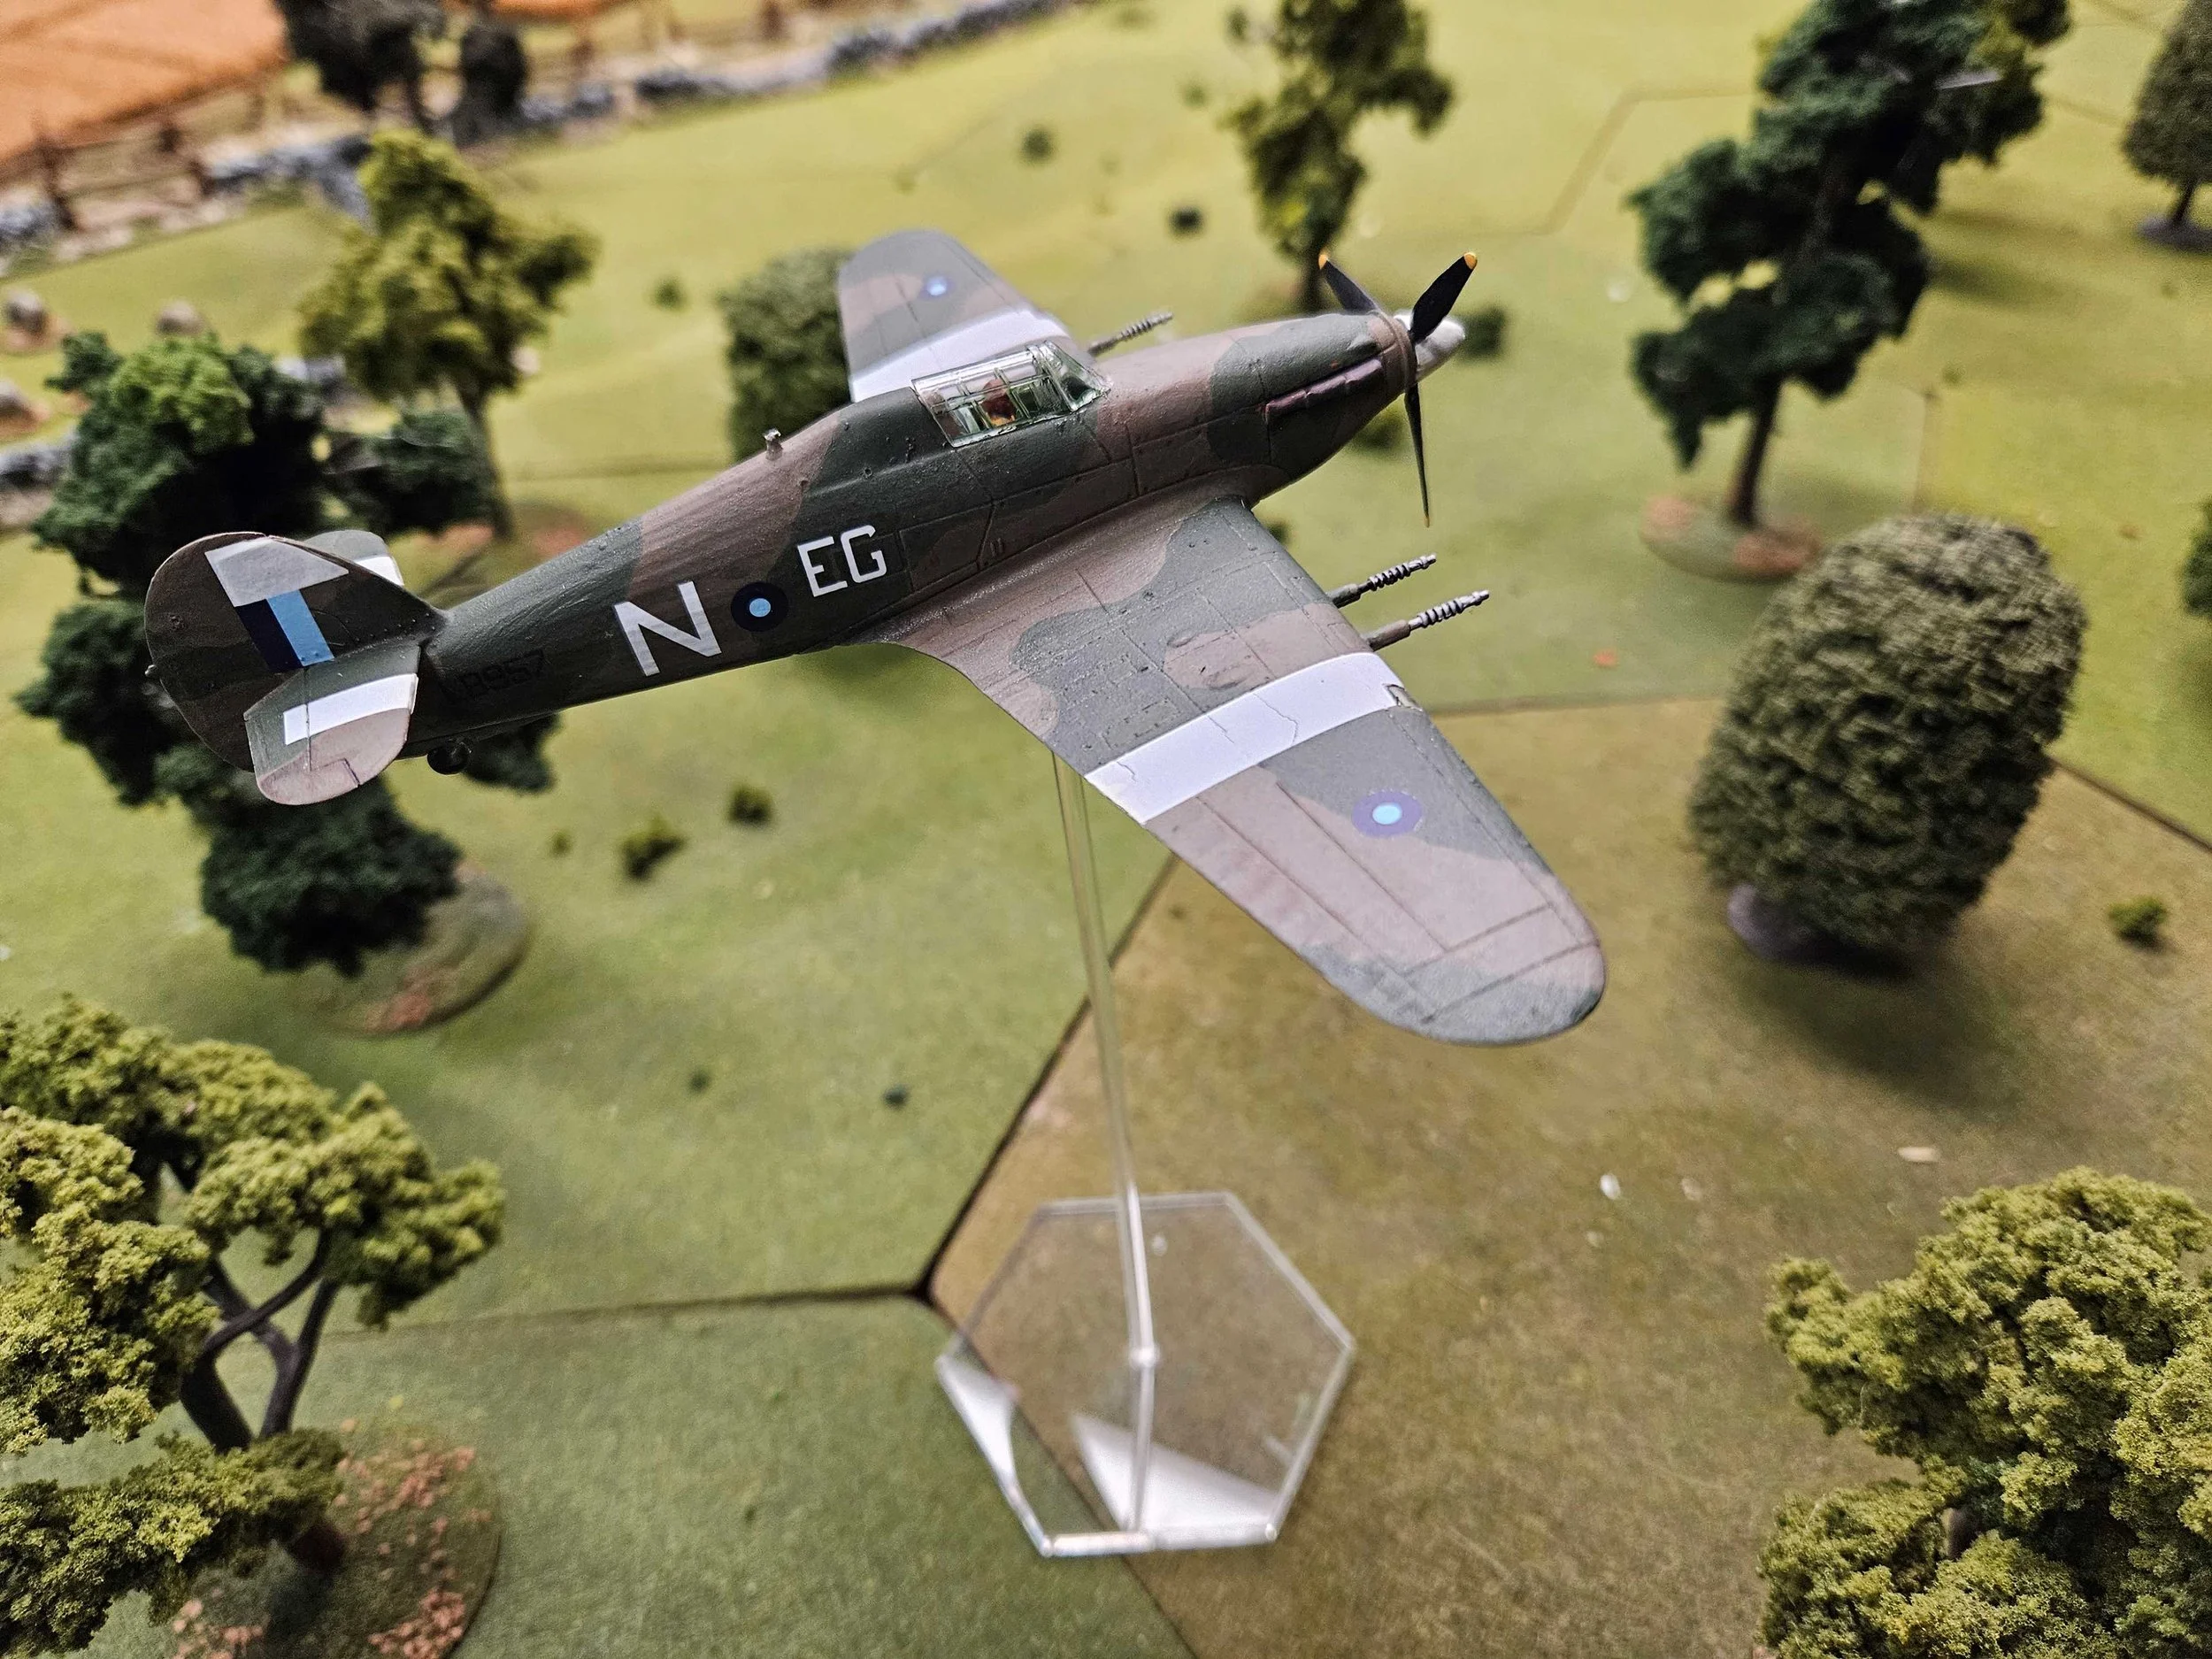
The flying model was not too difficult to build either, although there’s no clear guide as to what angle to seat the wings: you have to work out the sweet spot where the wing tilts down sufficiently without coming out of its fuselage slot.

I sprayed each model with a military green undercoat, then washed them with GW Agrax Earthshade, then carefully drybrushed a very slightly lighter military green from front to back. I then painted the legs black with a steel dry-brush, the jet outlets in a dark red with the black soot-stains on the nearby fuselage, then added some bright yellow and blue ‘markings’ where the relief work on the model suggested I should.

I use my usual 12” flight stand, but with a very solid rare earth maginet to hold the Raxa in place. I love the pteradactyl-look of the craft in flight!

Here are some more shots, including the official ones from the Alternative Armies website:

A very nice model that will prove very useful on the tabletop either as a combat piece (flying), an objective (landed) or both. Recommended.

TTS AAR: To The Smallest Game 3: Timurids vs Neo Assyrians

My third game at the 2024 Tio The Smallest competition at Firestorm Games in Cardiff was against Michael’s Neo-Assyrians. The action would take place on the Thermopylae table i.e. a narrow-ish stretch of open ground flanked by the sea on one side and mountains on the other.

I forget who won the scouting, but the two armies set up very differently indeed. Michael, cautious of all my cavalry, squeezed his troops into one corner, whereas I, looking for that outflanking opportunity, occupied the other!

My plan was fairly obvious: advance forward strongly and curl around the Assyrians’ left flank, forcing them to fight to the front and sides at the same time.

For their part, the Assyrians stayed squeezed into their corner, which suited me down to the ground…although I was finding my cavalry weren’t advancing forward quite as fast as I wanted them too: the Assyrians had too much time to prepare for my assualt!

Finally I was in position to attack, but the delay had given Michael enough time to skillfully position his men in a defensive ring, making good use of the patches of rough ground to protect his flanks.

The first round of my attacks went in on the Assyrian flank with a collosal assault that swept the first line of Michael’s defence aside, forcing him to send his second line in to hold the Timurids back.

Meanwhile, a unit of kharash driven slaves probed the ‘corner’ of the Assyrian position and, much to everyon’e surprise, managed to send a unit of enemy infantry routing from the field.

The Assyrians, however, quickly recovered their balance, moving the last of their reserves to block the potential incursion.

Unfortunately, the clock was ticking onwards, and as the morning’s games had taken slightly longer than expected, the game’s slightly curtailed allocation of time was now coming to an end.

The Timurids smashed forward one more time, but just couldn’t break through the Assyrian lines.

With the game now ended, we totted up the victory medals: the Timurids might have sent quite a few Assyrian units fleeing from the field, but it had been an expensive business in terms of casaulties to do so.

In the end, the game was a winning draw in the Timurids’ favour: ten medals to nine i.e. the very narrowest of margins!

Michael had mounted a superb defence against my Timurids, and had come within Ames Ace of taking the result. A great game that had exhausted all involved!

TFL Painting Update: First July update

Here’s a handful of entries to the Painting Challenge to set you up for July…

First up, we have Mr Slade, with some more terrain and the start of his next 28mm army:

Then we have our other most prolific painter, Mr Helliwell, with more medieval and WOTR types:

Chris Kay has a mix of old and new: an M54 truck and some Roman cavalry:

Stumpy adds to his ACW collection, with a Union artillery battery in 28mm:

and last but certainly not least, Steve Burt has been building terrain:

Some lovely work there, and plenty of time to get your entries in. There’ll be another July update in a couple of weeks, so pick up thsoe brushes and get to work!

TTS AAR: To The Smallest Game 2: Timurids vs Sassanid Persians

My second game at this year’s inaugral To The Smallest 15mm event for To The Strongest was against Si’s Sassanid Persians.

The terrain was a representation of the battle of Cannae, including a stream splitting off part of the left hand side of the battlefield, with it being compulsory that at least one of your camps be placed on the other side of the stream i.e. on the smaller part of the battlefield.

With both sides being largely mounted, each side headed towards the other at a rate of knots: lancers in the middle, light cavalry out on the wings. On what I will call ‘the strip’, the Timurids had their Afghan javelinmen keeping some Sassanid light cavalry at bay.

Unfortunately, I miscalculated (or Si perfectly calculated!) the schwerpunkt moment, with the result that rather than initiating all the charges to contact, it was my Timurids who were on the receiving end of every charge, giving the Sassanids that key first hit advantage.

The results were not pretty! Although the Sassanids tok damage, it was the Timurid heavy cavalry that suffered the most, with the battlefield after the initial clash looking surprisingly empty of still-fighting units of either side!

At this point I was forced to commit my reserves: the kharash driven slaves heading into action in an attempt to shore up my left flank.

With my line steadied, things began to improve for the Timurids.

I even had some success in the centre, where a unit of lancers broke through the enemy line and pursued some Sassanid heavy horse towards the Persian camp.

But in the end the casualties that I had taken at the initial clash came back to haunt me. Although I had pulled things back until we were even on casualties, it was all over when a unit of Sassanid light cavalry broke through my diminished line and took my camp and therefore my last three medals.

So a 10-13 defeat for the Timurids, which made two games played and two losses.

Surely things could only get better in game three…

TTS AAR: To The Smallest Game 1: Timurids vs Classical Indians

Earlier in June, I made the long journey to the excellent Firestorm Games in Cardiff for the inaugral To The Smallest competition i.e. a To The Strongest tournament played in 15mm.

This featured 160 point armies (15-20% larger than the usual 28mm tournament armies) played on a 10mm rather than a 15mm grid, giving everybody much more room to manouevre.

My problem was that all my existing armies were set up for a 15mm grid, so the only army that I could easily convert (i.e. no re-basing, just purpose built movement trays) were my Timurids. This wasn’t actually a problem: the Timurids conquered quite a bit of the world, so were bound to do well in competition!

My first game was up against Matt Slade’s Classical Indians on the Khadesh battlefield: so at least my horsemen would indeed have lots of room.

My plan was to keep his heavy chariot strikeforce busy with one of my cavalry commands whilst sweeping around his right flank with the other, attacking from front and sides to get the advantage.

As the game began, I therefore advanced strongly towards the Indians.

On the left, I quickly got in amongst it with one of his commands, although the elephants there caused my cavalry plenty of problems (in TTS, horse fight very badly against nellies); whilst on the right, I hung back and began peppering his charioteers with arrows, unfortunately to no effect.

Unfortunately, I just couldn’t break through on the right (fighting elephants with cavalry was one reason - I just couldn’t kill that elephant no matter what I threw at it) but Matt’s heavy chariots burst through my light cavalry screen and then my heavy cavalry as well.

Things were not looking good!

I needed to do something to break through on the left, so committed my reserves: the kharash units of driven-slaves. Here you see them moving up into action (bottom left).

The kharash c-rashed into the fight and, combined with some heavy cavalry, knocked an Indian infantry unit out of action. I was whittling his forces down on the left, but two units of elephants were still giving me problems.

Meanwhile, on the left, my troops had given up the ghost, leaving the way clear for his chariots to head for my now-undefended camps.

Which then promptly fell, giving Matt all the coins he could possibly need to win the game!

The score was a 9-14 loss for me, with Matt justly rewarded for his good play: his use of elephants to de-fang my heavy cavalry was excellent. I should have hung back and peppered the pachyderms with arrows instead of mixing it in melee!

Three games to go…and my Timurids had better pull their socks up!

Q13: Barad join the Ursid

Regular visitors will know that one of the sci-fi armies that I use for Quadrant 13 is the Ursids: effectively bears-in-space-with-guns!

I have Stan Johanson’s Lesser Ursids and Khurasan’s Greater Ursids already, so it was really only going to be a matter of time before I added Trilaterum’s Barad as well.

Let’s start with a size comparison:

L to R: Barad - Greater Ursid - Lesser Ursid - Human

As you can see, the Barad tower over even the Greater Ursids, and make the hapless Mexican Juarista infantryman on the end seem absolutely teeny-tiny in comparison. An example of either significant scale creep or another example of humans being the shortest species in the known universe!

So the models are big, but don’t let that put you off: they are also exquisite and full of character. Here’s a whole platoon of the little beauties:

Barad “Den Infantry” Platoon

I very much like the oriental look of the Barad: samurai armour and a type of kasa which is what I think the straw farmer’s hat is called in Japan (rather than the more elaborate jingasa).

Besides their standard assault rifle, the Barad also carry a Tri-Barrel infantry support weapon that is fielded both as part of an infantry squad and in separate support teams.

The Tri-Barrel: when a BFG is just not big enough

Now I’m not a great believer in co-incidence, but those familiar with the Stan Johanson Lesser Ursids will know that they use circular disc-like hover platforms to get about…and so do the Trilaterum Barad.

I don’t know if this is indeed a happy accident, deliberate, or perhaps even an homage, but it’s great for the consistency of my total Ursid force.

Here’s a squad of Barad Air Cavalry on their grav discs:

The basing is all provided when you buy the pack: much appreciated

Very tasty!

Some sci-fi manufacturers would leave it there, annoying those of us who want to field a company-sized force that would need the odd support weapon as well.

Step up the Barad Artillery: really large canon mounted on a grav disc:

You’ll note another happy co-incidence: Khurasan’s Greater Ursids nearly all sport sun glasses and, as you can see in the pictures above, many of the Barad do as well.

It’s a nice touch, and means adding a little chrome to the Ursid army list is easy: Ursids of all shapes and sizes have eyes that are senstive to bright light.

So there you have Trilaterum’s Barad, now part of my Ursid force and ready to take to the field.

Highly recommended, even if they are absolutely huge!

If you go down to the woods today…

TTS AAR: Classical Indians versus Burgundian Ordnance

As our ECW game had finished quite quickly, friend Rob and I decided to extend our gaming session with a quick bout of To The Strongest.

It wasn’t exactly a historical match-up - Classical Indians with their javelinmen and chariots vs Burgundian Ordnance with their Later Knights - but at least both sides had plenty of longbows to hand!

[For those of you looking for the heavy chariots, I was actually using a Republican Classical Indian army using standard chariots.]

Both sides opened the game by sprinting towards each other, keen to get into contact.

The Burgundians had advanced a unit of mounted infantry onto the hill to the right of my line. It looked a bit isolated to me, so a good target for my chariots and cavalry.

This worked very nciely, with my two mounted units combining to overwhelm the Burgundian foot from front and flank.

Rob followed up with one of his Later Knights units, charging forward to engage my javelinmen whilst some mounted crossbowmen kept the victorious chariots busy.

One unit of Later Knights versus four units of javelinmen, so I was confident that I could do the same again: overwhelm an isolated unit. I even got the initiative and sent my brave infantry in against the Knights.

Now some of you will know that I often feel that the cards are, quite frankly, against me; and I am sure that some of you think I should stop being wet and just get on with things: after all, luck is always even…

Add in a series of unfortunate morale checks and it’s a case of now you see them, now you don’t:

So that was eight victory medals gone up in smoke, my only consolation being that his Knights tried the same trick on the last remaining unit of javelinmen and got sent flying.

Phew! I might have lost the flank, but at least it was safe and I had a unit of cavalry keen to visit the enemy camps!

Meanwhile the rest of my army had advanced into contact with the Burgundian centre and right wing.

I had high hopes here: my escorted elephants were rock hard (even if Rob did manage to avoid hitting them with cavalry (who get a huge penalty for the effects that the nellies have on horses)) and accompanied by the equally tough Maiden Guard.

I also had my left wing in action: managing to outflank another units of his Knights:

My central command did its job: two of Rob’s units destroyed for no loss:

Both the Indians and Burgundians were now down to very few medals indeed, which meant that the battle would go to the next side that knocked an enemy unit from the field.

Luckily, I had my chariots still around in the centre of the field, now faced by only a lone unit of Burgundian organ guns. These were swiftly swept from the table, which caused the enemy general sheltering behind them to go as well, giving me enough victory coins to win the day!

So a narrow victory for the Indians over a very tough opponent…not that there were many of my men left to celebrate!

Q13 Army Lists Updated

It’s been ages since I updated my sample army lists for Quadrant 13, the sci-fi version of I Ain’t Been Shot Mum.

Since the last update, I’ve added loads of figures to my collection, so have updated the lists accordingly.

In this update, we have:

  • Trilaterum’s Reavers added to the serpentine Astagar

  • Stats for the Ikwen plus all the new flyers added to the mini-dinosaur Chuhuac list

  • Clear Horizon’s Hura added as a new list: infantry from Clear Hoizons supported by some of Brigade’s excellent vehicles

  • The Invaders added as a catch-all “little green man” list using infantry from Khurasan plus all those tripods I bought for All Quiet on the Martian Front.

  • The marine Pelagic Dominate army gets stats for the Laminids and Mozzians

  • Those dogs of war, the Protolene Khanate, add the Raug from Khurasan and the Garrhul from Dark Star to their roster

  • I’ve added some Dark Star vehicles to the Tah-Sig

  • And finally, the Barad from Trilaterum have been added to the Ursids

So a fairly major update there for you all to enjoy:

Q13 Army Lists

TFL Painting Challenge: Second June Update

I’m happy to say that there are already enough entries in to justify a second Painting Challenge update in June…so let’s have one!

First up is, I think, probably our largest single entry ever: Sapper has been, as he puts it, beavering away on a 28mm Napoleonic Russian army, earning himself a massive 1,300 points in one photograph:

An impressive achievement.

Next up is Mr Davenport, with a cracking mixture of ECW, WW2 and AWI figures: very nice indeed:

Carole has also been busy: a selection of 28mm character figures mostly from the excellent Bad Squiddo plus a handful of 15mm WW2 tanks:

Meanwhile, Mervyn has been painting dinosaurs:

It wouldn’t be a Painting Challenge update without something from Mr Helliwell…and as usual he’s actually sent in quite a lot of somethings for us to enjoy. This time it’s a mixture of Reconquista figures and terrain, just some of which are shown below:

And, finally, Steve Burt has the rest of the 02 Hundred Hours figures finished:

Plenty of inspiring work there, so pick up your brushes and let’s see if we can justofy a third June entry!

FK&P AAR: Mundaydean Lane

Friend Rob and I are working our way through the Siege of Norchester campaign pack for For King & Parliament. This was the seventh scenario of the twelve presented in the pack, and I went into it a mere two Victory Coins behind Rob.

Mundaydean Lane is a “catch the pigeon” scenario where the Royalists have to escort a coach carrying a VIP passenger off their opposite table’s edge.

Note the ROyalist coach half up the right hand edge of the table

The left-to-right hedges on the table neatly divided the field into three separate areas, each of which ended up being fought as almost a separate battle.

Cavalry Clash on the Left

On the left hand side of the battlefield, the Parliamentarian Borders Horse, mounted on their flea-ridden nags, clashed with a brigade of Royalist Swedish horse.

Unbelievably, rather than being ridden right over, the Borders Horse held their own, and the two sides just about cancelled each other out.

In the end, one unit of Borders Horse pursued a broken Royalist unit almost into a position where they might turn and threaten the Cavalier rear - where the target coach was lurking - but the Royalists had a small unit of horse held back just for this eventuality.

Here’s a chronological gallery of the action on the left:

Cavalry Clash on the Right

The geography also sectioned off a cavalry clash on tghe right hand side of the field. Here a brigade of Parliamentarian Dutch horse squared off against a brigade of Royalist Swedish horse: this would be the brute force of the Roundheads versus the more agile Cavaliers.

The Parliamentarians took the initiative and headed straight for the enemy: their aim being to dash them from the field before curving to the left to chase down the “pigeon”.

Unfortunately, the initial clash did not go well for the Parliamentarian “Puritan Horse”, and they soon found themselves well on the back foot (hoof?) in a brutal, close-quarters melee.

Nothing went right for them…even including an attempt to pull back from the central fight resulting in an Ace being drawn.

The Royalists duly punched through the middle of the Parliamentarian line and soon it became obvious that the Cavaliers had won that wing. Things were not looking good!

The Centre

In the centre of the field, the Royalist infantry proved initially reluctant to move forward: particularly the brigade to the (Royalist) left.

This allowed the Parliamentarians to get forward and form a firm battle line well up towards the enemy lines. The Roundheads even had time to get their Border Reivers into a position where they could use the wooded terrain to their advantage.

In theory, on the left hand side of the infantry fight, I should have been able to get an advantage: my troops overlapping the enemy. Unfortunately, however, the veteran Royalist foot were having none of that, and I soon found myself under some pressure there.

Likewise, when the two lines did clash, despite a wild Highland Charge from the Reivers, I just couldn’t seem to tip the balance in my favour: things just weren’t working for me today!

My infantry began to give way and soon my last victory medal departed and the day was to the Royalists.

Conclusion

Well that had been a thumping defeat for the Roundheads. Having started the day only two medals behind in the campaign as a whole, I was now twelve behind overall!

Lots of work to do in the last five games of Norchester, something to reflect on as my troops sat watching the “pigeon” sail through their lines!

IABSM at OML10

My afternoon game at Operation Market Larden X was Phil & Jenny’s excellent Throw Them Back scenario for I Ain’t Been Shot Mum.

This involved a German counterattack on one of the Normandy beaches just after D-Day, with my instructions being, as one of the German players, to get a significant force “onto the sand”.

This turned out to be a cracking encounter with exciting action right from the start.

Click on the picture, below, to see all:

And thanks, as ever, to Adrian and team for organising such a great event overall.

Operation Market Larden X

It seems extraordinary, but the Operation Market Larden Lardy Day in Evesham has reached its 10th manifestation i.e. leaving aside COVID lockdowns, it’s now ten years old…and I’ve been to every one.

This year’s event was the usual cornucopia of excellently run Lardy games, all played in the very best of Lardy spirits. Unfortunately real life commitments kept me from both the Friday night pre’s and the Saturday night meal, but I very much enjoyed the day itself.

Before I talk about the games I participated in, here’s a quick table-by-table look at what was on offer. All the pics are taken from first thing in the morning, so are devoid of any action, but just look at the set-ups!

In the morning, I played in Sid’s excellent Blood on Fallen Snow scenario for When the Last Sword is Drawn or Banzai Bonkers for short!

I partnered with Gareth, and our task was to secure several treasures at a shrine nominally under protection.

In short, although we succeeded in our mission and slaughtered the enemy, we technically lost the game as our opposition gained more on or honour than we did: something my partner in crime was largely responsible for as every duel he was in consisted of his Dirty Tricks technique verses the honourable conduct of the enemy!

I was so caught up in the action that I neglected to take more than a couple of shots of the game. Here they are:

Superbly created and umpired by Sid, I cannot recommend When the Last Sword is Drawn enough!

I’ll cover my afternoon game in the next post…

Timurids at Vanquish...Part Two

With the first game such a disaster for the Timruids, I was keen to ‘get back on the horse’ and try my luck again against the Early Byzantines.

For this game, as it was supposed to be a participation/demonstration event, we had a brand new player join the table, so he (with a bit of help) would face me.

The calm before the storm

As you can see in the picture, above, this time I adopted a more traditional deployment: infantry in the centre, with my cavalry on the wings. My plan ws obviously to outflank on the left, and roll up his line to the right.

The two sides quickly headed towards each other, with my plan to conquer all on the left starting to unfold.

The plan unfolds

Unfortunately, the cards had other ideas and my flanking manouevre failed dismally!

Flanking force stymied by an Ace

This left me very vulnerable to the fire from his mass auxiliaries with bows, and soon our new companion was drawing 8s, 9s and 10s from his deck to shoot my heavy cavalry straight off the field.

I’ve never seen cards like it. Usually shooting is more of a nuisance than a threat, but here my opponent drew so many high cards that we calculated that there were only four 8s, 9s or 10s left in the deck, whereupon he promptly drew two 8s for his next two shots!

For my units in the center and right of the table, it really was a case of “now you see them, now you don’t”!

My flanking force on the left had now started to arrive, but it was too late to make a difference. One more ‘twang’ of enemy bows, and the last of my coins left the table!

All that was left was on the left!

So that was Vanquish: an excellent little show but with a decidedly sub-optimale performance from the Timurids.

Let’s hope this weekend’s inaugural To The Smallest goes better!

Reavers join the Astagar

Regular visitors will know that I have a company-sized force of Astagar: the sci-fi snake-types from what was Critical Mass Games but now available from Ral Partha Europe.

I’m always looking to add to my sci-fi collection, so when browsing the Trilaterum website I was pleased to see that one of the factions, the Parici, also had a set of snake-types with guns. Very different from the Astagar, but still distinctly serpentes.

Slight problem in that Trilaterum only deliver to their native United States, but a bit of ingenuity later I had a couple of squads of Reavers in my hand ready to be painted.

These were so easy to paint that I managed to do all of them, from undercoating to final varnish, in one day.

The Reavers come in two parts: the main body and a separate head, with three different head types included (plus plenty of spares). You have a standard closed-mouth head, a closed-mouth tongue projecting head, and a snarling mouth open head.

As I was going to be using Contrast Paints, I began with an undercoat in GW Grey Seer. I prefer Grey Seer to the White: although you get slightly bolder colours with the white, it does show through up more if you miss a bit.

Start with the belly: Skeleton Horde. Don’t worry about staying in the lines, just slop it on.

Next is the war-harness. I used Snakebite Leather for this: it seemed appropriate! You need to be reasonably careful with this colour i.e. try not to get too much on the actual Reaver. Note that the harness fastens at the front onto a sort of breastplate, so you need to paint that bit too.

Now the best bit: the main snake skin. I used Creed Camo for this, but the Trilaterum site has the Reavers painted with a yellow colour and, in fact, almost any colour would do. They are aliens, after all.

Do be careful when painting the snake skin next to where it hits the Bleached Bone belly. I found the best technique was to outline the belly both sides before painting the rest of the main torso.

After that, it was just finishing off by painting the guns and the eyes in Black Templar, the two fangs in (standard acrylic) white, and the tongue (where it shows) using Warp Lightning. Where I had used snarling mouth open heads, I painted the inside of the mouth (including the side jaw webbing) in Hexwraith Flame (paint the mouth first before anything else).

I also painted the spikes on the war-harness in a standard acrylic bronze colour. I was considering having one or two with silver spikes as squad leader types but, in the end, didn’t bother. I’ll be looking out for a Big Man figure where I can find one.

So that’s a two-squad platoon of Reavers added to the Astagar, rapidly becoming one of my favourite armies to field.

The Astagar

Timurid's at Vanquish...Part One

I had another opportunity to practice for To The Smallest at this year’s Vanquish show in Bourne End, as friends of mine from SOGS were putting on a TTS demo game.

I only arrived at lunchtime, but we still managed to find time for two games: both would involve my Timurids fighting a force of Early Byzantines.

In the first game, my plan was to stack my infantry on the right, then head forward with them as fast as possible before turning to roll the Bysantines up from the flank. You can see the first moves in the picture above.

This worked really well, and had the added advantage of keeping my troops away from his rather nasty extra-bow-armed auxiliary-types in the centre.

My flanking force got into the perfect position, and turned to begin the rollup. Surely nothing could stop me now!

Well you’d think that, wouldn’t you!

Unfortunately the cards deserted me in a big way, and my perfectly positioned flanking force just wouldn’t get moving or, when they did, achieved almost nothing.

Meanwhile, in the centre, his largely-raw auxiliaries suddenly developed backbones and just wouldn’t break despite the attentions of my heavy, half-veteran cavalry. In fact, rather than fleeing from the field as they should, it was my horse that ran away!

Nothing was going right for me, and with the last of my victory medals handed over to my opponent, the game was lost!

A 2-14 defeat that boded ill for my chances in Wales!

TFL Painting Challenge: First June Update

It’s been a bit quiet recently on the Painting Challenge front: several of our regulars have commented that real life and/or wargaming events have got in the way of their painting. That said, still a good number of entries for our first June update

First up we have Mr Emmett with some lovely kit for an Arnhem game he’s running. I particularly like the Daimler Armoured Car.

Andrew Helliwell delivers next. He claims to have painted less than usual for this entry, but that still seems like quite a lot to me! Highlight is the medieval Italian carroccio with sacred banner…

Next up is Mr Burt, with the rest of his Java Seas ships and some late WW2 infantry:

Sapper sends in some rather nice 15mm Arabs with some 28mm WOTR in support!

And then to finish we have Matt Slade with some more 15mm Classicial Indians and Mervyn with huge numbers of 15mm ACW infantry:

So, as I said, a fairly quiet entry for the Challenge so far in June.

Do make sure you visit the individual galleries, accessed through the NavBar, above: some terrific work on display…and those of you who have entered this year: pick up those brushes and get moving!

19thC AAR: A Maximilian Adventure

Friend Bevan and I finally got a chance to get a game in last week. As I was hosting, I gave Bevan the choice of what to play, and he suggested we break out Neil Thomas’ Rules for 19th Century Wargaming again.

That was good with me, so I put together a quick Maximillian Adventure battle: French versus Mexican Juarista, a theatre not specifically covered in the rules, but easy to create based on the stats for French armies from 1859 and 1870 and a bit of research to fill in the gaps and stat the Mexicans. For those interested:

The French

  • French Elite Troops (Foreign Legion, Zouaves): Elite, Later Breechloading Rifle, Loose Order

  • French Cosmopolitan Troops: Average, Rifled Musket, Loose Order

  • Most Cavalry: Average, except for the Chasseurs D’Afrique: Elite

  • Artillery: Bronze, Rifled

Infantry have Elan and Broken Terrain.

Average command levels.

Mexican Juarista

  • Mexican Elite Troops (Los Supremos Podres): Average, Rifled Muskets, Close Order

  • Mexican Regular Infantry: Levy, Rifled Muskets, Close Order

  • Guardia Nationale: Levy, Smoothbore Musket, Close Order

  • Cavalry: Average

  • Artillery: Smoothbore

Poor command levels

As you will see below, although I had the stats about right, I’m not sure I got the forces involved sufficiently balanced.

The Game

The scenario involved a French column moving along a road, with a Juarista force coming at them from one flank.

Seeing the hordes of Mexicans descending upon them, the French quickly snapped round and began moving towards them, with skirmishers from the FFL and the Zouaves rushing forward to bring the lead Juarista units under fire.

Seeing all these French columns heading up the hill towards them, the Juaristas changed formation into line: their plan being to weaken the columns with fire and then charge them with the regiment still in column.

Meanwhile the Mexican regular cavalry moved up on the left of their line, also ready to exploit any opportunities caused by the devastating fire that was doubtless soon to fall on the French line!

Unfortunately for the Juaristas, the French commander knew what he was doing and, knowing that his breechloaders gave his troops a considerable advantage in terms of both range, cover and firepower, decided to forego the usual tactics of elan and charge and challenged the Mexicans to a shooting match.

Talk about unfair tactics!

Faced with inevitable defeat in the firefight, the Mexicans attempted to switch back into column and take the fight to the French, but this just made the matter worse, as the French were now in a good position to do to the Mexicans what the Mexicans had intended to do to the French: blow the Juarista close order columns away before they even got into contact.

Someone in the French camp had obviously fought at Waterloo - just about possible!

The Mexican’s situation was not helped by some rather impressive French dice-rolling: nothing like walking through devastating fire to put a real dent in your dia!

The end of the battle was now fast approaching: we had been using a modified victory medals system for checking overall morale (i.e. each side had a certain number of victory medals representing about 30% of the bases under their command, with a victory medal surrendered for each base lost) and the Mexicans were down to their last few medals.

As a final throw of the dice (pun intended!) the Mexican cavalry charged their French counterparts and, much to everyone’s surprise, actually managed to beat them back.

But unfortunately it was too little too late, and another round of French fire saw the last of the Juarista medals evaporating away. With their tails firmly between their legs, the Mexicans withdrew, only the efforts of their cavalry preventing them being ridden down by the victorious French.

FK&P-E AAR: Polish Lithuanians vs Ottomans

Friends Mark and Si have been collecting Polish-Lithuanian and Ottoman armies in 28mm to use with my “eastern front” variant of For King & Parliament.

As I currently have neither army in my collection finished, and play in 15mm, I was keen to have go. I would play the Polish-Lithuanians (hereafter known as ‘the Poles’) and John and Si would play the Ottomans (hereafter known as the Ottomans or the Turks!).

The Poles won the scouting, so I deployed my Winged Hussars and veteran Pancerni cavalry on the left, my guns in the centre, and some German foot supported by Reiters and Turkoman light cavalry on the right.

The Ottomans had their Janissery infantry and artillery on my right, their Azab levy foot in the middle, and their Sipahi cavalry (including some guard) on my left.

The game opened with each side moving their cavalry forward as rapidly as possible, and soon a collosal melee broke out, horse swirling back and forth amongst the confusion of the battle.

Meanwhile, my plan on the right had been to use my ‘German’ horse and accompanying lights to disperse the enemy horse in front of me, then advance to threaten the flank of the enemy infantry and guns as my ‘German’ foot advanced to contact from the front. Unfortunately the cards had other ideas, and my men refused to move more than a token distance towards the enemy.

The Ottoman cavalry command opposite my ‘Germans’ had exactly the same plan, and did manage to advance forward into bow range.

Fortunately their attempts to do unto me what I had intended to do unto them failed miserably and, with a new turn beginning, I was able to clear the enemt horse away and start my ‘Germans’ forward.

This left the game progressing nicely: I reckoned my four units of foot with cavalry support hitting the enemy flank could take care of the Janiserries, and my cavalry on the left were all veteran versus merely a mixed bag of Turks, so provided Si couldn’t get the Azabs in on my guns and more ‘German’ foot in the centre, I should be okay.

And so it came to pass: my cavalry on the right proved unstoppable, and soon Ottoman horse were fleeing the table in great numbers.

In fact, the battle was won on the left by the cavalry before my poor infantry and flanking cavalry had time to get stuck in at all:

So a solid win for the Poles…doubtless helped by my secret weapon lurking in her crate under the table: a fierce Pomeranian* mascot to inspire my troops to the heights they achieved!

*Pomerania being part of Polish Lithuania at the time!

Location of the Pomeranian Voivodeship within the Polish–Lithuanian Commonwealth