IABSM AAR: Take the Ztarmerski Bridge!

Lovely looking game of IABSM posted onto the IABSM Facebook Group by Phil Turner.

The Wehrmacht is advancing across the Russian Steppe at speed. It is of vital importance that the Ztarmerski bridge over the river Korbynskia is taken before the Ivan’s have the opportunity to destroy it.

Click on the picture below to see the full AAR:

IABSM AAR: D-Day Spectacular

Here’s a superb write up of what looked like an absolutely cracking game of I Ain’t Been Shot Mum featuring another of Desmondo’s brilliant Sword Beach D-Day spectaculars.

The report is taken from Iain Fuller’s marvellous Tracks and Threads blog, and with extra pictures from the IABSM Facebook group.

Click on the picture below to see all:

IABSM AAR: Break-Through

For those of you who are on Facebook, I recommend joining the I Ain’t Been Shot, Mum group. People there answer questions about the rules, post up pictures of their forces, ideas for scenarios and, of course, after action reports.

Here’s one from James Moulding featuring late war action in a break-through scenario. Click on the picture below to see all.

IABSM AAR: September War #24: Ambush in the Beskides

My turn to host a game of I Ain’t Been Shot, Mum, so I chose a scenario from the first September War scenario pack that would allow me to field some of my new motorised infantry vehicles: #24 Ambush in the Beskides.

The game would feature a German attack on a prepared Polish position. The Germans would have the numbers, but had a time limit, and those Poles were very well dug in!

Click on the picture below to see all:

IABSM AAR: Beyond Le Plessy

Yesterday’s post featured an After Action report from Des Darkin covering a game he ran for Iain Fuller and Philip Andrews.

Today’s post is the same game, but written up by Iain.

Usually I would combine the two AAR into one massive report, but both are such good AAR that I’ve decided to keep them separate.

Click on the picture below to see Iain’s colossal report on the second Plessy game:

IABSM at Winter Wonder Lard

Last weekend saw another excellent Winter Wonder Lard at Bristol Independent Gamers. On show were games of Chain of Command, Sharp Practice, Strength & Honour, What a Cowboy and, of course, I Ain’t Been Shot Mum.

The IABSM game was based on the tank battle on the Calais - Dunkirk Road, near St.Omer on 22nd May 1940.

On That day a patrol sent out from the Calais defences reported German tanks on the road between Calais and Dunkirk and fighting towards St.Omer. Staff Officers at Calais disputed this, stating that there were no substantial German forces within 30 miles of St. Omer and this could only be a stray reconnaissance patrol.

A British Force was ordered towards St.Omer to drive off these random German troops, but came into contact with lead elements of 1st Panzer Division, who were attacking French troops on the edge of the town.

Click on the picture below to see all:

IABSM AAR: Home Run at Osmanville

An excellent I Ain’t Been Shot Mum battle report for you to look at today, from Scott Miquelon’s equally excellent Little Soldier Painting Studio blog.

Scott has created a comic-book style AAR showcasing his solo game using the Home Run at Osmanville scenario from the 29 Let’s Go Large article in the TFL 2014 Christmas Special.

Click on the picture below to see all:

Artillery for the Gebirgsjaeger

With the 17th Century Cossacks now done, I needed something to paint whilst I decide what’s next.

Regular visitors will know that I re-photographed a lot of my collection of 15mm WW2 figures over Christmas, and re-building their galleries inspired me to fill in some of the gaps.

One such hole was some heavier artillery for my German Gebirgsjaeger mountain troops, and I remembered that somewhere in the lead mountain lurked the figures I needed. Much banging and crashing and sorting through boxes and cupboards later, I found the packet I was after: a Battlefront special order of two 105mm GebH 40 mountain howitzers (the GebH is short for Gebirgshaubitze).

The GebH 40 was the heaviest mountain howitzer ever made, but still broke down into four loads on single-axle trailers towed by kettenkrads or five pack loads carried by mules. Some 420 were made between 1942 and 1945, firing HE, AP, smoke and illumination shells.

Manpower Shortage

So I had the guns but no crews…and with Battlefront working on a reduced inventory (COVID etc) I needed to delve a bit deeper into the Lead Mountain to see what I could find to use.

First off were a few Gebirgsjaeger infantry, including two officers who would now command the gun teams: two down, eight to go.

Next I found some spare crew for the heavy mortars already in the Gebirgsjaeger collection, and although they are obviously toting mortar bombs rather than artillery shells or charges, they would do: six down, four to go. That’s where I hit the wall: no spare German artillerymen anywhere!

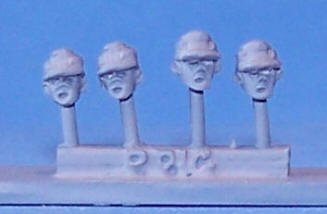
I did, however, find some Battlefront British artillerymen in shirt sleeves and some spare Gebirgsjaeger heads from Peter Pig’s head swap portfolio. A snip, a drill and a pin later, and I had my ten crew.

Making a Match

The next problem, of course, was how to paint them to match my existing Gebirgsjaeger: something made more difficult by the fact that I’ve been using Contrast paints almost exclusively for the last few years and the Gebs pre-date that change.

Fortunately I keep a rough record of what colours I paint things: nothing fancy, just a spreadsheet with rows labelled things like “Headgear”, “Coat”, “Trousers”, “Boots” etc. To give you an idea, the list for the Gebs was so old that it pre-dated the new GW acrylic range, so I also had to look up, for example, the fact that GW Graveyard Earth was now called GW Steel Legion Drab and, as you will see, I still didn’t get it all correct.

Some advice to all you painters out there:

  1. Never throw any spare figures away

  2. Always have a supply of spare heads (Peter Pig recommended)

  3. Always write down what colours you use for your figures

The Finished Product

So here they are: two 105mm GebH 40 mountain howiters:

These look great…but I am going to have to repaint the greys because I now realise that the grey doesn’t match the Shadow Grey highlight that I used on my originals. Apparently I should have used a colour called The Fang but didn’t: I looked in the pot and thought it looked a bit blue.

So it’s back to the painting table for these guys when I get a moment: the colour will have to go on over the varnish but it’s only for a touch-up highlight so should be okay.

Here’s the infantry guns picture so you can see what I mean:

Next up: a massive bit of hole-filling for the WW2 Poles!

IABSM AAR: South of Cherbourg

Here’s a quick IABSM battle report from Sergeant Steiner’s excellent blog.

The Sergeant played through one of the free scenarios in the main rulebook: the South of Cherbourg game. This is an all infantry scenario with regular Wehrmacht defending against advancing US troops in Normandy in 1944.

Click on the picture below to see all:

IABSM AAR: Blenneville or Bust! #4B Reversed

Here’s an after action report that shows how flexible the IABSM scenario books are.

James Moulding and friends played scenario #4B from the Blenneville or Bust! scenario pack, but with the roles reversed i.e. in the original game, the British are attacking defending Germans but in this game it’s the British defending with the Germans attacking.

Click on the picture, below, to see all:

Note that this report is taken from the IABSM Facebook page. I hope James doesn’t mind me reproducing it here.

IABSM AAR: Viking Panzers in Central Poland

Another cracking I Ain’t Been Shot, Mum battle report from the pen and camera of Mark Luther.

It’s another 6mm battle fought at the Gigabyte’s cafe, and this time features a somewhat generic game based on actions to the east of Warsaw in August 1944 where the Soviets had sent masses of tanks through thin lines of the German defenders. The panzer units were then forced to scramble to cut those units off before they totally disrupted the front.

Click on the picture, below, to see all…